Monday, July 1, 2013

Progress

It has been about 20 days since I last posted. I apologize for that! This summer has been hectic! I have been updating my Facebook page www.facebook.com/KimsGreenThumb If you would like to stay more up to date!

I was late getting my garden planted, since I had to build new boxes this year. But now-20 days after planting, things are doing well!
I'm going to keep this mostly photo-graphical, as time is still short, I will be sharing my progress.

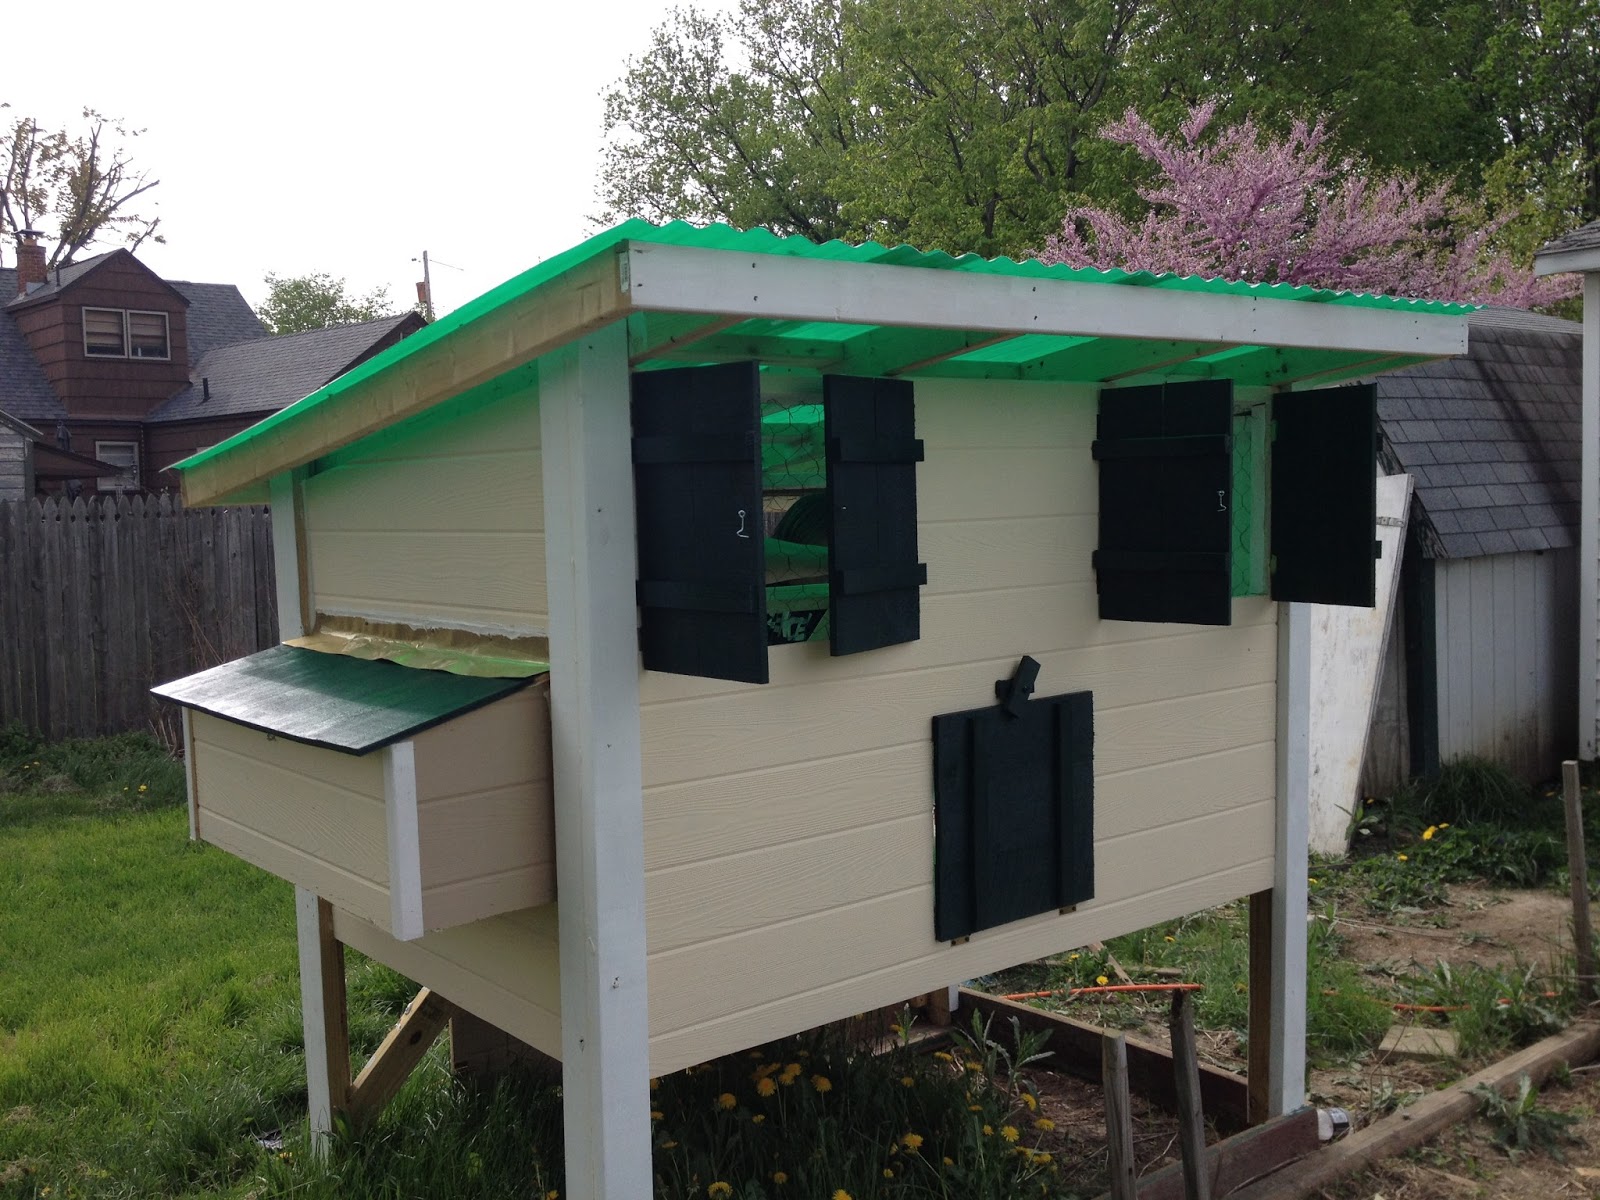
On the chicken coop and run:
The girls are finally moved in an loving it! AND they have started laying at only 16 weeks! In the past 6 days I have gotten a total of 5 eggs! I think that is great!


I also have progress on my garden beds. I got them planted June 13. VERY late this year! But the last week we have been getting some nice rain, and they seem to be catching up!  I have 4 beds, that I've mentally numbered. 1-4 and I drew a little map so I know what I planted where. 


 This is Bed #1 on June 20, and on the 30th
 This is bed #2 on June 20 & 30th.


This is bed #3 On June 20 & 30th.

AND This is bed #4 on June 20 & 30th.

What a difference a little rain can make in 10 days! 

I hope you all are having a nice summer! Enjoy!

Monday, June 10, 2013

Crazy life

I have been so busy with lots of things going on-I haven't taken a moment to write to you lately. I apologize for that! 

Recently the family took a weekend camping trip to mammoth cave in Kentucky. We had a wonderful time & enjoyed our cave tours. 

I've also been working on some drywall at my parents house, and school is back in session, so I am also busy with that. 

I have a nice bunch of peas, just about ready to harvest in my garden pots on the porch. So my St. Patrick's day planting was successful! And the frost didn't hurt my plants. I am still behind in planting a lot of other things in my garden. I currently have some leeks, 15 tomato plants, and 4 zucchini plants, a little but of kale, and some herbs going. I have a lot more to plant. It's raining today, so it looks like today will not be the day I get that done. 

Here's a picture of my peas.


Have a great day!  

Tuesday, May 21, 2013

It pays to shop local!

Today I headed out to the local feed store to try to get some straw for my potato towers, and garden beds to use as mulch...Unfortunately he had sold his last bale of straw yesterday, and wasn't expecting the farmer to bring him more until tomorrow. I was a little bummed, but planned to return tomorrow to get my straw. When I told him my plans for the straw he stopped me and said..

"Well, if you're just using it in your garden, I have a bunch on the floor of the barn over there where I keep the straw. If you have a way to haul it, you can have it!"

I tell you I jumped on that opportunity. The hubby and I left to empty the bags of dirt off the trailer, and returned with tarps, and rope to collect our straw. It took about a half an hour, the feed store man also let us use one of his tarps, we filled an 5'x14' about 6" deep with straw, covered it with his tarp, he also gave us 4 pallets to place on top, to hold the straw down. We tied it all down and returned home with WAY more straw than we had intended to purchase originally. When we returned his tarp, I also gave him 11 of my tomato seedlings, which he was very happy to get. And we got 4 more pallets in return!

IT PAYS TO SHOP LOCAL!!! 

The people in these stores become part of your lives and sometimes you can be mutually beneficial to each other! I got the straw I needed, and got rid of some of my over abundance of tomato plants, and he got his barn cleaned out and ready for a new straw delivery for free, and HE got 11 tomato plants!

I was also able to give my neighbor some of my tomato plants today, and planted my tomato beds with 13 plants. I plan to plant some out by the chicken run as well as in my raised beds.

Tomorrow, if the weather holds, I will be busy playing in the dirt, mixing my planting mix, and my straw and hopefully be ready to plant my garden! 

Friday, May 17, 2013

It's a dirty job but...

I have been a bad blogger lately! SHAME ON ME!
But I have been REALLY busy! So busy in fact, that MY projects have all come to a virtual stand still! But I have been learning new things too! I've learned how to lay hard wood floors, how to use the circular saw, and also how to hang drywall (although I don't think I have the strength to do that alone)
We did take the time last week to go out and purchase the "ingredients" for the soil in my raised beds. For my 4-  3'x6' garden beds we purchased 3 big cubes of  peat moss. This helps hold moisture, and I LOVE to use peat in my garden. In addition to helping the roots stay moist longer, the dirt doesn't seem to get as hard as a lot of garden soils do. I also purchased compost. The one I have commonly bought is composted manure. NO-it does not smell like manure, so don't worry about that, but it is a nice dark soil with a natural built-in fertilizer, after all, it WAS manure! And I also bought top soil. I never use top soil alone, in my experience it is always hard as a rock! I mix these 3 ingredients to make my own rich soil that my plants really seem to like.
In my 2 raised beds I made last year, I didn't even buy the top soil, I just used the composted manure and peat. My tomatoes REALLY took off in that mixture!  Off 4 tomato plants, I canned over 48 pints of stewed tomatoes. Not too shabby if I do say so myself! :)
The other day I took a short inventory of the tomato seeds I'd sown off my tomato plants from last year and I am up to 109 in small pots. There are still more in the raised bed to transplant into small pots so I can give them to friends and family, and since there are so many, I will probably also sell some. I plan to plant some over by the chicken run as well, to give the chickens a treat from every now and then!


Friday, May 10, 2013

So Busy Lately

I wrote this about a week ago and forgot to click publish...
I have been SO busy lately, I can't even think right anymore! What with the school semester winding down, building the fence, (which still needs gates) building the chicken coop, (which still needs a couple doors) and we haven't even gotten to building my garden boxes which I am starting the feel a desperate need for...
I feel like everything is just sitting here 1/2 done, or not quite started. I can't even find time to crochet, which is one way I relax! The house is a mess, the chickens are staring to get crowded and NEED their coop...I'm about to move them into the dog cage and I'm sure that the dogs wouldn't appreciate that one bit...but at least the chickens would have more room to move.
The sad thing is, for as busy as I've been, I'm still feeling like I'm lazy, probably because nothing is getting done.
Here's hoping we can get the doors mounted on the coop and the chickens moved out today & then I can clean the dining room and actually be able to use it again! Maybe then I'll feel like I've DONE something!
I realized that its been a while since I gave you an update...WELL, since I wrote the above on my "down day" last week, I did move the chicks into the dog cage for a couple days and then we DID get the chicken coop completed and the chicks moved in. They seem to like it out there too. More room to move.

 We also got 2 of the 3 gates made and hung on the fence. I was surprised to find that Walmart had the fence hardware that we had been looking for since the project started, at a reasonable price. We had seen the gate hardware other places, but not at a price we were willing to pay. So THAT project end seems in sight.

My raised bed garden boxes are also assembled now. I have them in the place where I want them, I just need to get the dirt into them. I have tiny vegetable plants all over my picnic table waiting to me moved into their permanent home. So I am feeling a little antsy about getting the garden working now too.


I also went out yesterday and Weds and helped my hubby work at his parents house, laying hardwood floor. Now, this is not a "green thumb" type project, but I did learn a lot. I can now select, and randomize hardwood planks for floors, set them in place AND use the pneumatic stapler to secure them. I also used the 10" compound sliding miter saw. I am not proficient at it, and it takes a little more muscle than I thought it would, but I can make a straight cut with it!


Monday, April 29, 2013

Peach Tree

I was at the local Tractor Supply store last week, buying chicken feed, when on the way out of the store I stopped to look at their selection of trees. A peach tree caught my fancy and I just HAD to have it! It was a good size tree, already blooming, and only $20!  But my lot is only .47 acre INSIDE the city limits, and I had to think a bit on it...I currently have 14 trees on my property already! (and a bucket of rooted cuttings to add to my hybrid willow fence line)

I went home, discussed it with the Mr. who shook his head and just said "Another tree..." in a slightly exasperated way. Then a few days later, I saw my mom, who handed me a $20 bill and told me she looked at the receipt for my birthday present, realized it cost a lot less than she thought, and the $20 was the rest of my birthday present. Well,  I took that as a sign. I again discussed it with the Mr. and decided to go buy my tree.

Unfortunately, I was in such a hurry to get it once the decision was made, that I went to buy the tree in my car, the truck having left town with the Mr. & little Mr. the day before on a cub scout camping trip...Luckily, I have a sun roof, so getting the tree home was not much of an issue, although I did get some interesting looks in the parking lot as I loaded it into the car.

 My daughter and I made it safely home with the tree, unloaded it, and planted it over my my 2 apple trees, in a kind of triangle so my mini orchard now has a good start.
It's kind of hard to see, but the peach tree is in the center here & my apple trees in the back.
And, as you can see, the fence project is done too! (minus gates) 


Monday, April 22, 2013

Updates...

We are still working on the chicken coop, and the chicks are about a month old now. They are running out of space in the indoor brooder. The bonus is, at least this group of gals gets along together better than the Buff Brahmas that started fighting so we had to move them out early and then my dogs killed them...


In an update to my sweet potato blog sweet-potato-starters The slips are coming along very nicely.  Now I need to get the space in the yard ready to plant them in...I don't know if I'll be planting them in a container, or a potato tower, or just in one of the raised beds that I still need to build.


In an update to my planting peas on the 17th of March eager-to-plantpeas-and-potatoes. They are coming up nicely. And just after they started coming up we got our first frost warning...I had a mini panic attack on weather to cover them or not, did a little internet research and found this posting how-low-of-a-temperature-can-peas-stand which made me feel better knowing I'd missed the first night of frost on my peas without a problem. I am going to have to thin them out a bit here soon. 


I also did a little experiment when I started cleaning out my tomato bed from last year. There were a few tomatoes left on the vine over the winter, and I decided to sprinkle the seeds into the bed to see if they would grow or not. I placed a couple of windows over the raised bed, and then just left them be...OH BOY! to I have tomatoes now! 


 I scooped out a tight clump one day to figure out what they were, and saw little tomato seeds in with the root, so I gently separated the plants and planted them into a cardboard egg carton to see if they'd survive. And since that day I have also transplanted 36 more of the larger plants into larger peat pots, and I will need to do it again today, as the plants are starting to  touch the windows they're getting so big. 


Our fence is in the home-run stage, having less to complete than has already been completed, so that feels nice. We will have to stain it, but that can wait a short while until the other projects get done. The yard  also has finally woken back up from its winter slumber, so now we also desperately need to mow the lawn. So these two items are on the to-do list for today..


Have a great day everyone! 

Thursday, April 18, 2013

Progress on the Chicken Coop

Today more progress was made on the chicken coop. Admittedly, we haven't touched it much in the last week or so...I have put some paint on, but not all, as we hadn't even had all the panels attached yet.
So today's post will be mostly photo-graphical.
To look at our previous work on the coop click here.

Today we put the back on, which consisted of 6 pieces. 2 of which were doors. One for ventilation, one for cleaning. 


The lower door opens all the way up for ease of cleaning the coop.


This is the upper door, which will provide venting in the hot months.


Next we cut out the space for the nesting boxes. 
Built the nesting boxes, and attached to the exterior of the coop. 

The interior of the coop as seen from the front windows 
(which still need to be closed up)
At dusk, so the green roof is letting in plenty of light. 


Wednesday, April 17, 2013

Benefit the Bees

I had a friend tell me that she was concerned about our dwindling bee population. and wondered if there were any plants that would be beneficial in attracting bees, and encourage them to increase their population.


As you know, bees help pollinate, and without our plants being pollinated, we would have less flowers, and even less fruit, as pollination is key, to some plants providing fruit to us. 
So What can we plant to help out bee population? 
In my personal experience, my pussy willow bush, when in bloom is TEEMING with so many bees, that it literally buzzes when you walk past it!. But that is all that came to mind when I thought this question. 
So, I had to do some research to be able to offer more suggestions for you. 

Some general gardening advice quoted from gardening.about.com says: 
"Don’t use pesticides. Most pesticides are not selective. You are killing off the beneficial bugs along with the pests. If you must use a pesticide, start with the least toxic one and follow the label instructions to the letter.

Use local native plants. Research suggests native plants are four times more attractive to native bees than exotic flowers. They are also usually well adapted to your growing conditions and can thrive with minimum attention. In gardens, heirloom varieties of herbs and perennials can also provide good foraging.

Chose several colors of flowers. Bees have good color vision to help them find flowers and the nectar and pollen they offer. Flower colors that particularly attract bees are blue, purple, violet, white, and yellow

Plant flowers in clumps. Flowers clustered into clumps of one species will attract more pollinators than individual plants scattered through the habitat patch. Where space allows, make the clumps four feet or more in diameter.

Include flowers of different shapes. There are four thousand different species of bees in North America, and they are all different sizes, have different tongue lengths, and will feed on different shaped flowers. Consequently, providing a range of flower shapes means more bees can benefit.

Have a diversity of plants flowering all season. Most bee species are generalists, feeding on a range of plants through their life cycle. By having several plant species flowering at once, and a sequence of plants flowering through spring, summer, and fall, you can support a range of bee species that fly at different times of the season.

Plant where bees will visit. Bees favor sunny spots over shade and need some shelter from strong winds."
*everything in green is quoted from http://gardening.about.com/od/attractingwildlife/a/Bee_Plants.htm
I found simialr information in quite a few articles and blogs.

gardening.about.com also has a nice list of plants that attract bees that can be found here

Some plants that attract bees are: 

Apple Trees
Aster
Basil
Black-eyed Susan
Currant
Dandelions 
Elder
English LavenderGoldenrod
Green Beans
Honeysuckle
Huckleberry
LavendarLupine
Marjoram
Oregon grape
Purple coneflower (Echinacea)
Radish 
Rhododendron
Rosemary
Sage 
Squash
Sunflowers
Wild buckwheat 
Wild-lilac
Willow 

Zinnia

And much more! 

As I write this list up I realize I have quite a few of these plants in my garden. Including Lilac, willow (my pussy willow) Honeysuckle, and apple trees. This makes me happy...My only fear, it that the bees that visit my pussy willow tree live IN the walls of my house, as we found a dead hive when we remodeled 8 years ago, and another dead hive after a kitchen fire about 3 years ago...These are some of the perils of living in a house that is over 100 years old. Not that they have ever hurt me if the ARE living in my walls, it just freaks me out! 


 I also found a listing of beneficial plants that came from garland nursery:
http://www.garlandnursery.com/Handouts/plants_that_attract_bees.pdf


Tuesday, April 16, 2013

Growing Broccoli

I have tried to grow both Broccoli twice. Each time I have not had much success.
So I am going to turn to Google before I try again.
So, here is what I have found out from various places.

Broccoli likes a neutral ph soil. around a 7. on the PH scale. Allow about 18 inches in spacing between plants.

  • In cold climates, start your seeds indoors about 6 weeks before the last frost. OR direct sew 1 month before the last frost.
  • In warm climates you can direct sow the seeds in the spring. 
  • If you are transplanting a live plant, you can plant it up to 1 inch deeper than it was in its container. 
Broccoli shouldn't need any feeding, but if it looks like it needs some help, fish emulsion works nicely.
Keep your plant well watered and it will grow nicely.

Broccoli is susceptible to certain pests such as the cabbage looper, cabbage worm, and cabbage root maggot.

Don't wait until your broccoli has a large head to harvest like at the store, most varieties of broccoli do not form large heads, only select breeds do. Your plant can be harvested about 45 days from planting. (from seed-so if you buy a live plant, subtract some time) If you try to wait for a large head like at the grocery, you risk your plant flowering. If you cut the head with 4" of stalk remaining, more heads will start to grow.

These are all basic tips. For more in depth tips visit weekendgardener.net/vegetables/broccoli.htm


Monday, April 15, 2013

Impatience

Today I am feeling very discouraged in my gardening projects. This spring I am so excited, I can't seem to muster the patience required for my garden. I want it to be SO much further along than it is! My winter sown pots are starting to sprout nicely, even tomato plants that I DIDN'T plant are starting to grow. But I want more results!

I find myself spending a LOT of time online looking at different gardening sites for reference  and inspiration, and it just makes my impatience grow. I want that heat of summer when my garden is going full blast. where the fruits of my labor are becoming visible! But that will not happen...I will have to suck it up and be patient. I have plenty of projects going on right now, including the chicken coop, the new fence, and actually building those flower beds so I CAN grow my garden.

In addition to all my outdoor projects, I am also a student at the local college and taking classes online, the month of April alone, I have 6 family Birthdays to celebrate, 3 of which are in my immediate household. At times I feel like I am drowning in projects, but others, I feel like I sit around on my bum all day...I don't know how I do all these things sometimes! Maybe I have ADD & just need to have something to do!

I should go out and weed my front garden. The weeds are already threatening my herbs and strawberry plants, but the Canadian thistle in this garden is the bane of my existence  I have taken to calling it they hydra weed...If you don't get the root pulled out, and it breaks under the dirt, it seems that 2 come back in its place! It is very frustrating! I am tempted to bulldoze the yard at times, and make the attempt to start fresh out there!

Thursday, April 11, 2013

Busy Little Bee

There is a lot going on at the "Green Thumb Estate" We officially started building the new fence yesterday. Having rented a one man post hole digger for the Mr. to use for the 18 fence poles we need to place. We got to work (well, HE got to work) and drilled all the holes.


I also noticed the peas that I planted on St. Patrick's day have started peaking out of the dirt. Along with quite a lot of my winter sown plants in their containers. Especially the collard greens, and Kale.


The area where I planted my tomatoes last year, (and left the plants sit over the winter-causing a few small 'maters that were left to fall into the dirt & spend the winter there) has started sprouting a TON of little tomato plants. More than I will need this year! (I will be taking some and putting into starter pots to see if they survive and get big enough I may just give them to family and friends for their yards)


I also have a row of hybrid willow trees along the back of my property, that I trimmed last fall and tossed into a bucket of water, which also just sat all winter, with at least a half a dozen rooted cuttings to plant into that fence line, filling in where some didn't make it last year.

\
The chicken coop has gotten a first coat of paint on the body of the building (not the trim yet-will tackle that soon) 
I am also happy to see that my RedBud trees are nicely budded up, as well as my lilac bush, and will be blooming soon! My pussy willow tree is in full bloom, and covered with honey bees, collecting pollen. (Always happy to support out bee population!)

I LOVE SPRING TIME WITH ALL IT'S FLOWERS!


Tuesday, April 9, 2013

Sweet Potato Starters

I have a box of "seed" sweet potatoes that my grandpa gave me 2 years ago, that I forgot to plant last year. They were kept nice and dry in their box, in my laundry room, so they also had a nice steady temperature. 
So when I found them again this year, I left the box open a bit and they have started to grow roots.
One of my VERY strange looking "seed" potatoes, growing roots.
 Now I need to be sure to plant them, and I want to be sure to do it right...so it's RESEARCH time...
HOW TO GROW SWEET POTATO SLIPS? 
I don't know...YET
So off to Google I went and searched it out...
I found numerous postings about growing sweet potatoes, and various blogs about the subject...One blog in particular put it in a way that I think I can handle it! It was called outlawgarden.com
Their posting on how to grow your own sweet potatoes was very educational.

Basically what I learned about how to start your own sweet potato slips is this...
  1. Take an organic sweet potato (or one you have
    previously grown) and cut it in half.
  2. Submerge about 1 inch of the sweet potato in water
  3. Set the container with your potatoes near a window and wait
    ...keep enough water in it of course.
  4. They say after 4-6 weeks, you will have tiny little sweet potato plants growing off of your parent plant. 
  5. Snap the new plants off the parent plant where they meet. If any of your new slips do not have roots, soak them in some water until they have some roots. When they
    do have roots,just plant them.*
*it is best to wait until  after risk of frost and the ground warms up, if you need to, plant your slips into small pots, and keep moist until that time comes.

So now I will go do this with my sweet potatoes that I have, and I will let you know how it turns out! 
I also need to get my seed potatoes started, so I will jump on that today too!
My seed potatoes in their water. I will let you know how they turn out!


Ever the Deal Seaker

My house is in a perpetual state of construction...at least if feels that way!
With building the chicken coop, building the raised beds, and other things INSIDE the house breaking and needing fixed. I should know better than to go to the home store...today we went to get the material I'd hoped to purchase over the weekend, and when we got there we discovered a "black Friday again" sale on the material to build privacy fence, which we'd discussed doing a few times in the past. Since we have our tax refund, we decided to go ahead and get it.

It feels good to get one more project that has been on your mind checked off the list.


Once the lumber was purchased, we headed home to figure out where the holes would need to be dug, and all that good stuff. 
I also currently have a black, wrought Iron LOOK fence, that I will be re-locating to enclose my raised bed garden area once the new fence is done.
Yet another project I will be posting pictures of for your enjoyment! 


Sunday, April 7, 2013

SEEDS

I recently posted about ordering 9295 seeds from seedsnow.com,
well, yesterday I went out to check the mailbox and guess 
what was here?
YAY!
Now I am REALLY itching to get my raised beds built! 

Well in addition to my 9295 seeds that I ordered,
 I got a FREE GIFT! 
(I love free things)
My free gift was a large red cherry tomato starter kit that contains 10 seeds! 
I have a friend that has asked to use some of my garden space for some of her own things, and I got her seeds yesterday as well.
In return for garden space, and caring for her items, we get to keep some of it to eat too! So it's a win-win situation!

In addition to all these seeds, I also have my 10 lbs of seed potatoes, and a box of seed sweet potatoes that my grandpa gave me last year, and all the seeds I've already tried to start in my winter sowing containers.
 And all the garden beds need to be built still! 

So my plan for the day is to go to the hardware/lumber yard to get the rest of my chicken coop/chicken run material, the material to build my raised beds for the garden, and the material to build my potato towers I posted about yesterday.
So I have a LOT of work to do! 
and
I can't wait to get started! 


Saturday, April 6, 2013

Potato Procrastination

So, according to my local seed store lady...I was supposed to plant my potatoes on Good Friday. But I didn't. Since I was planning on planting in raised containers, that I haven't purchased yet, that kind of deterred the actual planting of the potatoes.
BUT today I found another method that I'd like to try instead of planting in trash cans, and I THINK this method may be a little cheaper to set up.

Again, thanks to one of the other blogs I subscribe to One Hundred Dollars a Month, I have learned something new. They had 2 pages dedicated to making potato towers, for growing potatoes.
diy-how-to-build-a-potato-tower  and how-to-build-a-potato-tower

Here are some pictures from the one hundred dollars a month website of how they look...
 And another once the potatoes start growing...

I think buying a roll of wire would be more cost effective than buying a bunch of trash cans, and then I don't have to worry about the plastic, chemical leaching into my food.
I will post pictures once I DO get them made.

I am planning a trip out to the hardware store tomorrow to buy material to finish building the chicken coop & attached run, including the paint for my coop...AND will be buying material to build my new raised bed garden, since the chickens are getting my old garden to run around in...(the neighbor trees shade the area too much to garden there anymore anyway) So I will be adding the wire to build my potato towers into this shopping list....Gotta love getting a tax refund.